How to Work With Captions in Microsoft Word


If you’re using visuals like tables, figures, or equations, you can add captions in Word to reference or explain items to your audience, here’s how.
Microsoft Word is a wonderful application for creating documents for business and pleasure. And if you happen to use Word for business documents, you may want to include tables, diagrams, images, or other types of visuals. To reference those objects in your content, you can simply add captions.
With captions, you can label various figures and even include a small line of text to describe each. Here, we’ll show you how easy it is to use captions in Microsoft Word along with options to have them fit your document style.
Insert a Caption in Microsoft Word
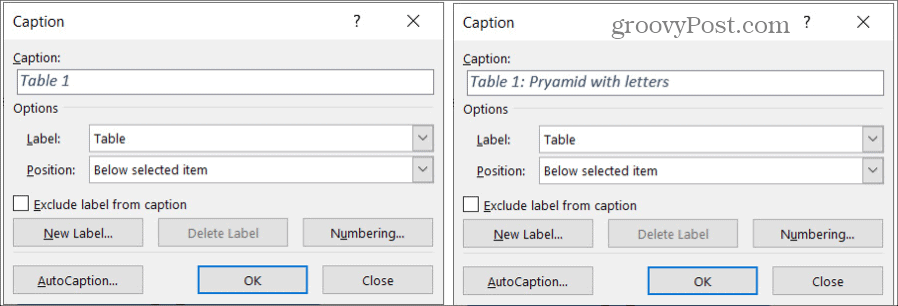
Once you have your object placed where you want it in your Word document, select it, and click the References tab. You’ll see a section for Captions in the ribbon. Click the Insert Caption button and you’ll receive a pop-up window for the caption details.
Caption
By default, the text in the Caption box displays the label followed by a number. This is helpful if you plan to simply number the objects throughout your document. So, you can have Figure 1, Figure 2, and so on, and Word will automatically number these in order each time you insert a caption for that label in the document.
You can also add other text to the caption if you would like to describe the visual differently. Just enter that text into the Caption box after the label and number.
Note: You cannot remove the number from the caption. Any text you would like to include can be added after the number.


Label
To select a different label, click the Label drop-down box and select Figure, Table, or Equation.
Create a New Label
If you like the idea of using labels for your visuals, but those in the list don’t apply, you can create your own. Click New Label, enter the label text, and click OK. Your new label will then appear in the Label drop-down list with the others.


Exclude the Label
Another option you might prefer is to keep the numbering for each object but remove the label from the caption completely. To do this, check the box for Exclude label from caption.
Position
You can choose whether you want the caption displayed above or below the object using the Position drop-down box. If that box is grayed out, it means you did not have the object selected when you clicked the Insert Caption button. You can hit Close in the caption pop-up, select the object, and then click the Insert Caption button if you would like to start again and use Position.


Additional Caption Options
Along with the settings above for your captions in Word are a couple of others you might find useful. You can access each of them at the bottom of the Insert Captions pop-up window.
Numbering
As mentioned, Word will automatically number your captions in order for you. But you have the flexibility to change the format of those numbers. For example, you might prefer to use letters. Click Numbering and then choose your style from the Format drop-down list.


Chapter Styling
If you use Multilevel List styling for your document, you can apply this to the captions. Click Numbering and below Format check the box for Include chapter number. Then make your selections the Chapter starts with style and the Use separator boxes.


Take Advantage of AutoCaption
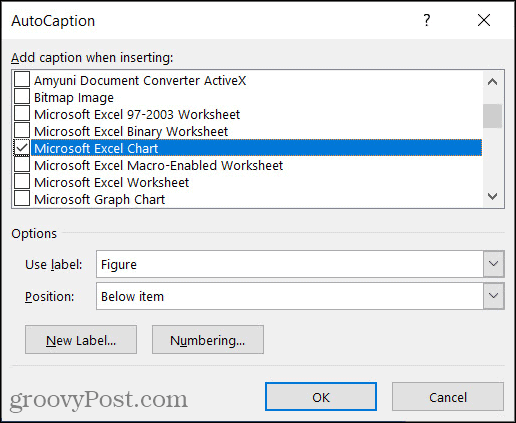
One more feature of captions in Word you can check out is AutoCaption. This is a useful time-saver if you plan to include captions often from the same source or type of visual. For instance, you may plan to insert many Microsoft Excel pie charts into a report you’re creating in Word. With AutoCaption, you can automatically caption each chart you add.
- Click AutoCaption.
- At the top, check the boxes for the applications or visuals you want to AutoCaption.
- Choose the label you want to use from the Use label Alternatively, you can create your own in this area too by clicking New Label.
- Pick the Position for the caption from that drop-down list.
- Optionally, you can select a different number format with the Numbering button.
- Click OK.


Now, each time you insert the visual that you selected, you should see a caption automatically appear for it.
Format Your Captions
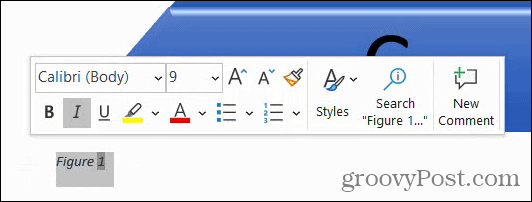
Once you have a caption in your document, you can change the style of it if you like. Simply select the text for the caption on the page. Then use the formatting toolbar that appears or the Font section of the Home tab. You can change the font style, size, color, or format.


If you would rather change the formatting for all captions in your Word document, you can do this by changing the Caption style. Just make sure that you have added at least one caption to the document.
Then, head to the Home tab and click the arrow in the Styles section of the ribbon. You should see a Caption style; right-click it and pick Modify.


Then make your changes in the pop-up window. Your adjusted Caption style should apply to all new captions you add.


Use Captions in Word for Tables, Figures, and More
Captions are very useful if you are creating documents like a report, proposal, manual, or booklet in Microsoft Word. You can reference the captioned visual in your content or describe an object in a subtle way.
And for doing more with graphics, take a look at how you can easily create a flowchart in Word.
You can stay up to date on our new tutorials and articles by following us on Twitter!


