How to Reset Audio Settings on Windows 11

If you are having trouble with sound or audio devices on your PC, you can reset audio settings on Windows 11 to fix the problem. This guide explains how.
Are you using your Windows 11 PC to record a podcast, record music, watch content in surround sound, or listen to high-quality audio? Chances are you have changed the sound settings or had an app change them.
So, if you stop using your PC for audio work or remove sound devices, you may need to reset the audio settings on Windows 11. Or, if you aren’t getting the sound quality you want or no sound at all, you can reset the audio settings and start from scratch.
Whatever the reason you need to restore the default audio settings on Windows 11, there are different ways to manage it. For example, you can reset sound devices and app volumes, audio device drivers, and system sounds on Windows 11.
Reset Sounds for All Apps on Windows 11
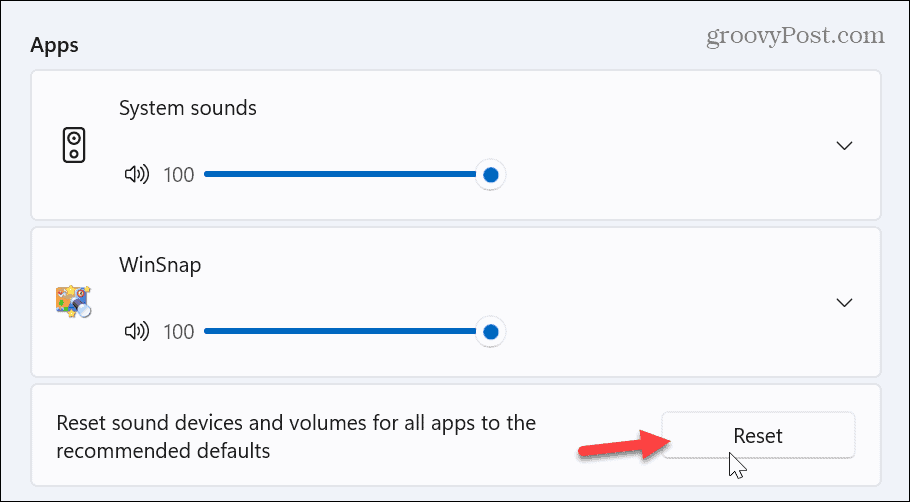
You may adjust sound settings in video or music apps through the Volume Mixer on Windows 11 and need to reset it.
To reset the Volume Mixer on Windows 11:
- Open the Start menu and select Settings.

- Select System from the left column and click the Sound option on the right.

- Scroll down to the Advanced section and select Volume mixer.

- Under the Apps section, click the Reset button next to the Reset sound devices and volumes for all apps to the recommended defaults option.

- Once the sound devices and volumes for apps are reset, a checkmark will appear next to the Reset button.


Reset Individual Sound Device Settings
You might need to reset everything if you have multiple connected sound devices, i.e., speakers, mixers, or headphones. So, you can reset individual devices to their default settings.
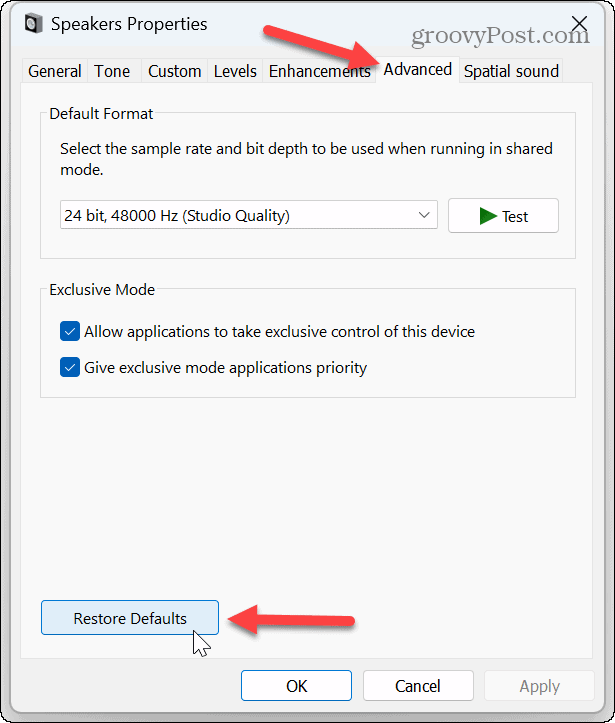
To reset individual sound device settings:
- Open Settings.
- Navigate to Sound > Advanced and select More sound settings.

- When the Sound window appears, ensure the Playback tab is selected and double-click the device you want to reset.

- Select the Advanced tab from the device’s Properties window and click the Restore Defaults button.
Note: The sound device is already set to its default settings if the button is grayed out.


Reset Volume for Devices
If your volume settings are off, you can adjust volume balance levels to help balance audio between headphones and external speakers. This also fixes the problem of some apps being louder than others.
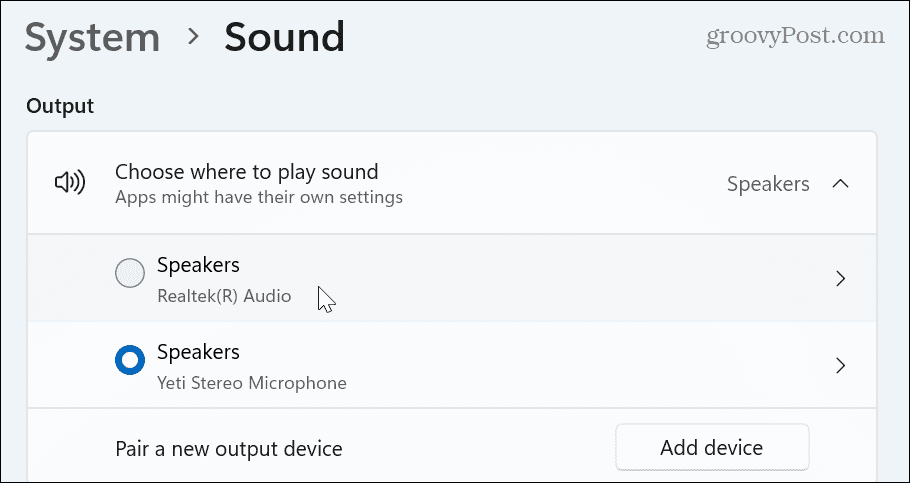
To reset the volume on Windows 11:
- Open Settings.
- Go to System > Sound > Output and click the Speakers option for the appropriate device.

- In the Sound section, set all the volume levels to the same level and ensure the Audio enhancements option is set to Device Default Effects.


Reset Audio Drivers
If you are experiencing audio problems with sound devices on Windows 11 and resetting devices doesn’t work, it could be a driver issue. Often, device drivers get out of date or need to be reinstalled.
To reinstall audio drivers:
- Hit the Windows key + R keyboard shortcut to launch the Run dialog.
- Type devmgmt.msc and click OK or press Enter.

- Expand the Sound, video and game controllers tree when Device Manager opens.
- Right-click the sound device and select Uninstall device from the menu.

- Click the Uninstall button when the verification message appears.

- Restart Windows 11, and during the restart, Windows will automatically reinstall the device driver.


Regarding drivers, it’s also important to mention that if you have a high-end sound card or audio interface device, you may need to install the driver manually. In addition, you can get new drivers by checking the device’s website.
Restart the Windows Audio Service
Another option you can use if your audio isn’t working correctly is to restart the Windows Audio Service. Of course, doing so is straightforward if you know where to look.
To reset the Windows Audio Service:
- Press Windows key + R to open the Run dialog.
- Type services.msc and click OK or press Enter.

- Right-click the Windows Audio service and select Restart from the menu.

- It will only take a moment for the service to restart, and you can see the progress.


After restarting the service, check if your audio device works. Note that this doesn’t reset audio settings; it only restarts the background audio service.
Reset System Sounds on Windows 11
If you are having problems with system sounds not playing or playing sounds you don’t like, you can reset the sound scheme to the default setting.
To reset system sounds:
- Open Settings.
- Head to System > Sound > Advanced and select More sound settings from the list.

- When the Sound window appears, select the Sounds tab at the top.
- Select Windows Default from the dropdown menu under the Sound Scheme option.

- Click Apply and OK to verify the Windows Default system sound scheme.


Manage Sound and Audio Settings on Windows 11
If you use your PC for audio work, the sounds and other audio settings can get out of whack after some time. However, you can reset audio settings on Windows 11 using the above steps.
There are other sound and audio settings you can manage on Windows 11. For example, if you have one speaker or want audio in one earbud, you can enable or disable mono audio on your PC. Or, if you’re doing a podcast or on a Zoom call, learn how to stop hearing yourself on a mic.
Another fun feature you might want to try is using voice access on Windows 11. Also, if you want a better way to control classic and modern audio settings, the EarTrumpet app for Windows is invaluable. And if your mic is giving your trouble, learn to test a microphone on Windows 11.


jamies
I suspect the article needs some tweaking –
Hidden sheets are also something to be looked at – probably needing to be unhidden
And then there are veryhidden sheets where the sheets do not even show in the select a sheet list (bottom left corner of #Excel window)
I usually start looking by creating a copy of the workbook,
then right click on a worksheet to see if unhide is not grey’d out , and unhide as needed.
then select all the sheets (select the first, shift and select the last in the tabs along the bottom of the window)
and use find for the files named in the links list
FindAll is a helpful option, expand the window, and use alt+prtscr to capture the panel’s window then paste that into a new .rtf file, or temporarilly into a new email
Select just a single sheet as indicated by that list –
(with all the sheets selected, any change can be applied to the indicated cell of all the selected sheets – and at this stage you would just be looking to see what can just be set to the “Value” rather than needing to be set to something differennt – maybe a new sheet with the variable values indicated in it, and the external links from other sheets set to data cells in that new ‘linksToGet’ worksheet.
So go through the links creating data value cells in the workbook and commentary etc, for the external links that were found!
jamies
Oops –
that should have gone under the Excel links article that appeared at the top of same web page above this article !