How to Apply Group Policy Settings to Specific Users

You can use the Group Policy Editor to make system setting changes that apply only to certain Windows users. This guide explains how.
You can use the Group Policy Editor to make setting changes if you run Windows 11 with a Pro, Education, or Enterprise license. However, when you do this, it affects all users on your PC. If this isn’t desirable, we’ll show you how to apply Group Policy settings to specific users on Windows instead.
You can do this with the Microsoft Management Console (MMC) snap-in tool that allows admins to manage Group Policy settings for the local machine. For example, you can customize system settings, user accounts, security, and other tasks.
If you want to apply Group Policy settings to specific users on Windows 11, this guide will show you how.
How to Apply Group Policy Settings to Specific Users on Windows 11
Group Policy is a built-in feature in the Windows operating system that enables users to modify advanced system settings on a local or remote Windows PC or server. With the use of Local Group Policy rules, Windows 11 users can make changes to advanced system settings on their PC. This feature is only available on PCs running Windows 11 Pro or higher, however.
When you change Local Group Policy settings, it changes the options for every user on the machine. For example, you can block desktop app access or turn off update notifications on Windows via Group Policy.
But you can apply system changes to specific users by creating a User-Specific Local Group Policy (LGOP) snap-in.
Note: Before getting started, it’s a good idea to create a Restore Point in case you enable incorrect settings and need to recover the system. Also, this article covers how to apply Group Policy settings to specific users on Windows 11, but the process is the same on your Windows 10 machines.
To apply group Policy settings for specific users on Windows 11:
- Press Windows key + R to launch the Run dialog window.
- Type MMC and click OK or press Enter.

- When it opens, click File from the toolbar and choose Add/Remove Snap-in from the menu.

- Under the Available snap-ins column, select Group Policy Object Editor.
- Click the Add button.

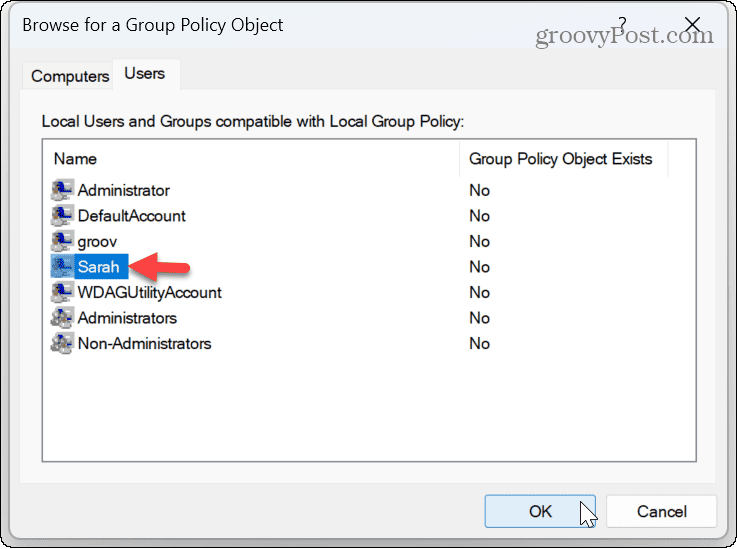
- In the Group Policy Wizard screen, click the Browse button.

- Select the Users tab and choose the user or group to apply the new settings.
- Note: You can change settings for users with a Standard user account by selecting Non-Administrators from the list.
- Click OK.

- Click the Finish button.

- Select the OK button to close the Snap-ins window.

- Click File from the toolbar and select the Save As option from the menu.

- Type in a recognizable name for the snap-in, ensure it has the .msc file extension, and save the custom console with configurations to a convenient location.


How to Use Specific Local Group Policy Settings
Once you follow the above steps, you can open the custom console configuration you created. From there, you can configure the settings for the specific user or group.
However, as usual, you can still use Group Policy to make system changes for the entire PC. You can then use the specific Local Group Policy Object (LGPO) to make changes to a specific user account.

To do this, double-click the Microsoft Management Console you created—any changes you make will only apply to your user account.

Customizing User Settings on Windows 11
If you need to make system configurations without the bother of modifying the Registry, having the ability to apply specific user settings is helpful. For example, you might want to prevent quick settings changes for a particular account through Group Policy.
There are more things you can change on Windows 11, including the ability to customize system icons or customize the Windows 11 Start menu.
And if you want to keep an account secure, you can make Windows 11 only install apps from Microsoft Store.


