How to Fix “The Exception Breakpoint Has Been Reached” on Windows 11

While you’re working on your Windows 11 PC, you might see the exception breakpoint has been reached error. Fix it using this guide.
While running a session on Windows 11, you may encounter “the exception breakpoint has been reached” error during a shutdown, restart, or launching an app.
The cause of the error can be hard to pin down, but there are steps you can take to resolve the problem. The error, usually accompanied by a (0x80000003) code, is Windows letting you know a problem occurred during the execution of an app or process.
If you’re experiencing this error, there are basic and more advanced steps you can take to resolve it.
Disable Problematic Startup Apps
If you get an error from an app during startup, it’s important to disable the startup app on Windows 11. If you know which app(s) generates the error, you can disable it from startup.
But if you’re unsure, you can disable all startup apps without affecting the Windows boot process.
To disable startup apps on Windows 11:
- Press the Windows key and open Settings.
- Select Apps from the left column and click the Startup option on the right.

- Sort apps by Name, Status, or Startup impact, and toggle off the switch next to the app you want to disable.

- Close out of Settings and restart Windows 11 to verify the error has been resolved.


Reset or Repair the App
If the error persists, you might need to reinstall the problematic app. However, before going through that process, you might be able to get by with resetting or repairing the app.
To reset or repair apps on Windows 11:
- Open Settings > Apps > Installed apps.
- Locate the app that’s popping up the error. Note that you can search for the app by typing its name in the top search field.

- Click the three-dot button next to the app and select Advanced options from the available menu.

- Scroll to the Reset section on the right and click the Repair button. A progress bar will appear while the repair takes place, and you’ll see a checkmark next to the button when complete.
- If the Repair doesn’t work, try a reset by clicking the Reset button.

- After the repair and reset actions are complete, restart your system.
- If you continue to get the error, reinstall the app.


Check for Hard Drive Errors
“The exception breakpoint has been reached” error could appear because of bad sectors on your hard drive. Luckily, you can run a CHKDSK utility scan that will detect and repair drive errors.
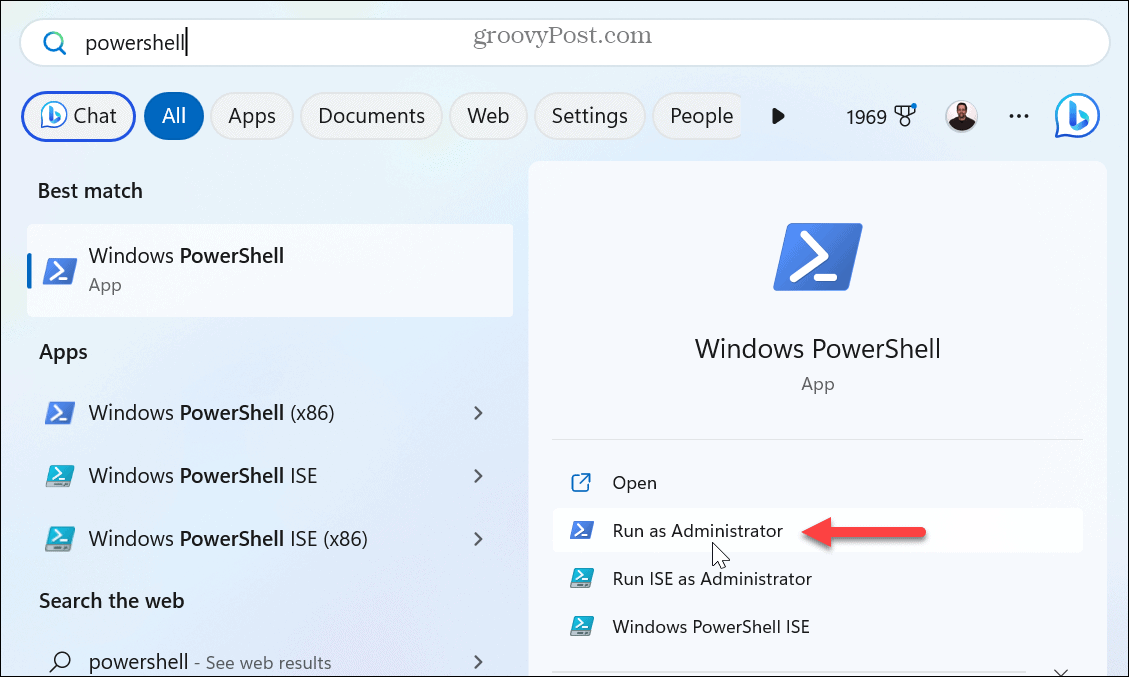
To run CHKDSK on Windows 11:
- Press the Windows key, search for PowerShell, and select the Run as Administrator option.

- When the terminal appears, type the following command and press Enter:
chkdsk c: /f /r

- Enter Y in the prompt, asking if you want the scan to run when the system restarts.
- Close PowerShell, save your work and restart your PC. The CHKDSK utility will scan your drive for errors and repair them during the beginning of the boot process. You will see it running at the bottom of the screen.


Run DISM and SFC Scans
Another cause of the breakpoint error could be corrupt or missing system files. You can typically resolve this by running SFC and DISM scans on your PC. These scans will check for and repair any missing or damaged Windows files.
To run SFC and DISM scans on Windows 11:
- Press the Windows key, search for PowerShell, and click the Run as Administrator option.
- When the terminal appears, type the following command, and hit Enter.
sfc /scannow
- After the scan is complete, run a DISM scan by running the following command:
DISM /Online /Cleanup-Image /RestoreHealth


Note that these scans can take a while to complete, and time varies between systems. Once complete, close the PowerShell terminal and restart your system.
Run the Memory Diagnostic Tool
If you are still having problems with the error, it could be due to a problem with the system memory on your PC having a memory leak. Luckily, Windows includes a built-in utility that can check for memory problems.
To run the Memory Diagnostics tool on Windows 11:
- Ensure all your work is saved, all apps are closed, and nonessential services are stopped.
- Press Windows key + R to launch the Run dialog window.
- Type mdsched.exe and click OK.

- In the Windows Memory Diagnostic window, click the Restart now and check for problems (recommended) option.

- The PC will reboot, open to the Windows Memory Diagnostics tool, and scan for RAM issues. The scan will take several minutes to complete. Ensure you allow the test to run even if it appears stuck.

- Once the scan is complete, you can sign back into Windows, and the Windows Memory Diagnostic Tool will display a notification so you can view the results.


Enable a Local Administrator Account
If you continue to receive the error, it could be linked to the type of user account being used. To resolve the problem, you can create a new local user account and assign it admin privileges.
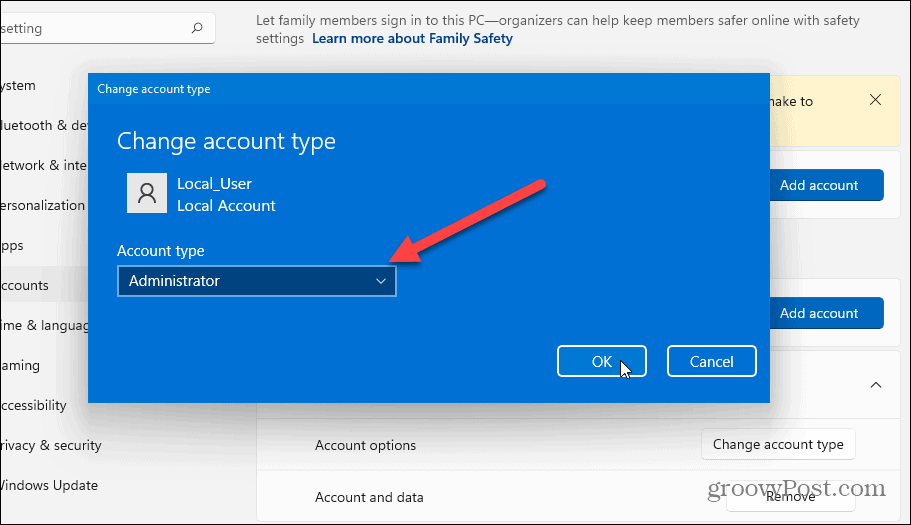
Once the account is created, sign in and see if the error is resolved.
Resolving The Exception Breakpoint Has Been Reached Error on Windows
If you get the exception breakpoint error, the cause isn’t tied to a specific app or service running on your PC—it can pop up while doing a wide variety of actions on your Windows 11 PC. However, you can typically fix it using one of the solutions above.
Of course, Windows is full of other errors you may find irksome, but we have fixes you can employ. For example, you might need to fix a “Device has Stopped Responding” error on Windows 11. Or, you may have an issue while archiving files and need to fix a Zip error on Windows.
Blue screen errors are particularly annoying, but you can fix a Ntoskrnl.exe BSOD error. And if you’re having problems with file management, learn to fix File Explorer not working on Windows 11.


