How to Set Up a Time Machine Backup in macOS

Time Machine is a backup feature in macOS. Learn how to set it up so you can back up files or your entire Mac and perform a system recovery if needed.
The last time we looked at Time Machine – the built in backup tool in macOS – was a while back when Apple still called its desktop operating system, OS X. We thought we should take another look at setting up and using Time Machine in a more recent release such as macOS Sierra or later. In this article, we show you how to create your first backup, restore the previous version of a file, and perform a system recovery using Time Machine.
How to Create and Manage Time Machine Backups in macOS
Before you perform a Time Machine backup, you will need an external hard disk with enough space to back up your entire Mac along with space for future needs. External drives are really cheap these days and you don’t need anything fancy; a USB 3.0 mechanical drive is recommended.
You can get drives with 2 TBs or more for $70, sometimes even less. If you own multiple computers running different operating systems, you can split up your external hard disk and share it with other systems. I would advise you double the amount of space according to the amount of internal storage. So, if the total size of the drive is 256 GBs, allocate 512 GBs for backup.
How and What Does Time Backup?
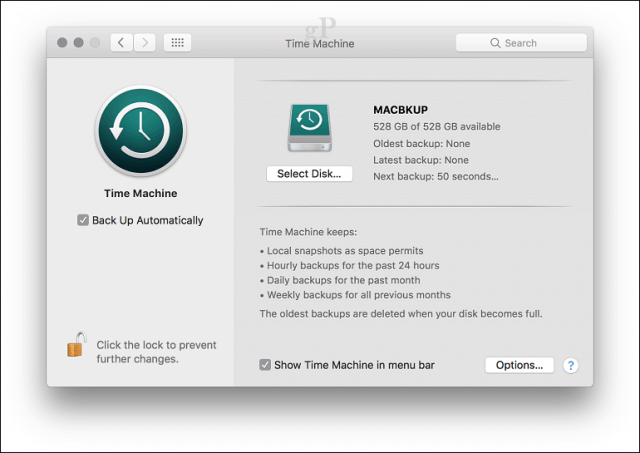
Time Machine creates incremental backups of files on your drive. Users can also restore an entire system or just specific files. Time Machine keeps the following:
- Local snapshots as space permits.
- Hourly backups for the past 24 hours.
- Daily backups for the past month.
- Weekly backups for all previous months.
Time Machine in macOS is easy to set up. Connect your external drive and you will be prompted to set up a drive for backup. If the external drive you are using has more than one partition, click in the list box, choose the drive then click Use as Backup Disk.

If you are not prompted, open System Preferences then click Select Disk.
Select the drive you want to use for backup, then click Use Disk. Note, you can also choose to encrypt the backup, which is recommended if you store sensitive information.

Click Erase to prepare the disk for use with Time Machine.

Wait while the disk is erased and Time Machine prepares to perform your first backup.

Time Machine will periodically notify you the last time you performed a backup. You can manually start a backup from within System Preferences > Time Machine or from the Time Machine menu bar.

Customize Your Time Machine Backups
Time Machine by default backs up everything, which uses a significant amount of disk space over time. You can save space by excluding folders or partitions from the backup. In Time Machines System Preferences, click Options, click the add button to select a folder, click Exclude then click Save.
From the same dialog, you can also enable the option to perform Time Machine backups while on battery power. Time Machine will keep backups as long as you have enough free space, but older backups will be deleted once the disk becomes full.

How to Restore Files from a Time Machine Backup
If you need to restore a deleted file or a previous version of a file, you can do so by entering Time Machine. This is where the benefits of the Snapshot feature become handy. From the Time Machine menu, click Enter Time Machine.

This will open the Time Machine interface where you will see a visual chronological backup of your information. An up and down arrow lets you move back and forth or you can hover over the graph on the on the right to quickly go through each backup period specifically. If you want to restore a file, select it, then click Restore.

Perform a Full System Recovery
You can also perform a full system recovery just in case your Mac is not booting. Power on your Mac, then press Command + R immediately before the Apple logo appears; this will load the recovery environment. Make sure your external hard disk containing the Time Machine Backup is connected and powered on. Select Restore From Time Machine Backup then click Continue.

Click Continue.

Choose the disk where your backup is stored then click Continue.

Choose from the list of backups available then click Continue. Note that some backups are likely to be older with previous point releases (ie. 10.12.6, 1012.5 or earlier). So, make sure you check for updates after recovery to install the latest updates.

Select the location where you want the backup to be restored—which is likely to be your local drive labeled Macintosh HD—then wait while the backup is restored.

After restoring, restart your Mac and you should be back to where you were the last time you backed up your Mac. As you can see, Time Machine is easy to use, but powerful solution built right into macOS. So, if you have been delaying your backups for a while, now is the time to start.
For Windows users, check out our ultimate guide for backups. And remember, there are excellent on line backup services such as Google Backup and Sync and OneDrive you should consider for extra protection. Brian recently covered options users should check out for backing up your most important data to the cloud.
Related:
- How to Install Windows 10 On Mac OS X Using Boot Camp
- Partition a Hard Drive for macOS Time Machine and Windows 10 Backups
- How to Create Partitions in Windows 10, macOS and Linux


