How to Fix 100 Percent Disk Usage in Windows 10

If your Windows 10 PC is running slow and you find that the hard drive is working at or near 100 percent, here are some steps you can take to fix the issue.
Sometimes your Windows 10 system will slow to a crawl even though you have a powerful CPU, plenty of RAM, and just a couple of apps running. While many factors can cause this, one is that the hard drive is working at or near 100 percent. It doesn’t have the spare cycles to perform routine OS tasks. This results in everything slowing down. A simple reboot, which often solves many OS issues, won’t fix an over-worked drive. Here are some of the things you can do to fix the disk usage problem in Windows 10.
Fix 100% Disk Usage in Windows 10
When you’re trying to figure out what’s causing the slowdown, you might have noticed that the Disk usage is 100% in Task Manager.
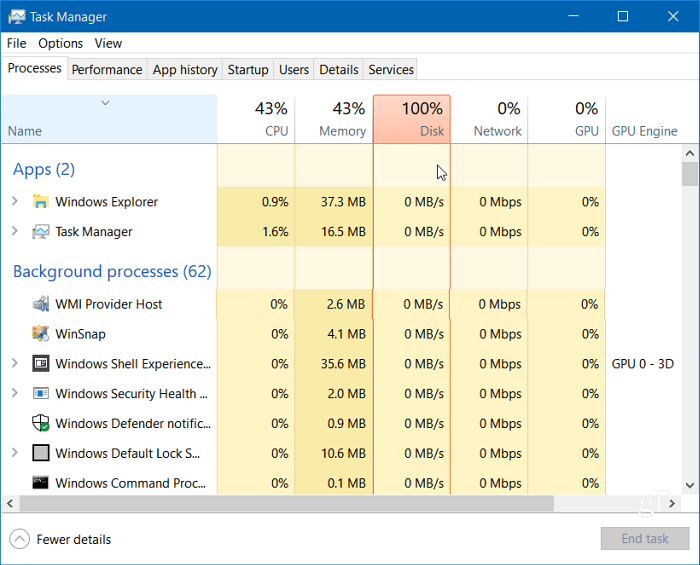
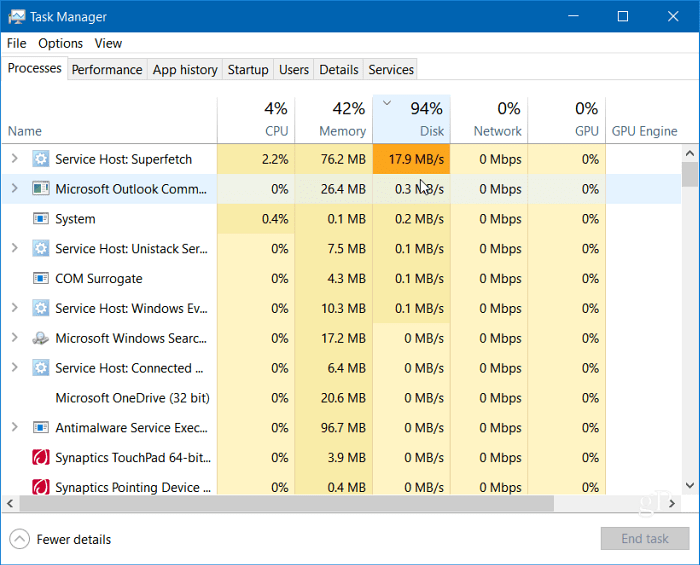
One of the easiest ways to find the culprit is to click the Disk column in Task Manager, so the items taking up more resources display in descending order. Like in this example shown below, you can see SuperFetch is likely the culprit.
Disable Windows Search
The Windows Search feature always indexes all files on your drive and is meant to make finding files on your PC faster. However, it can cause an issue where the disk is being overworked.
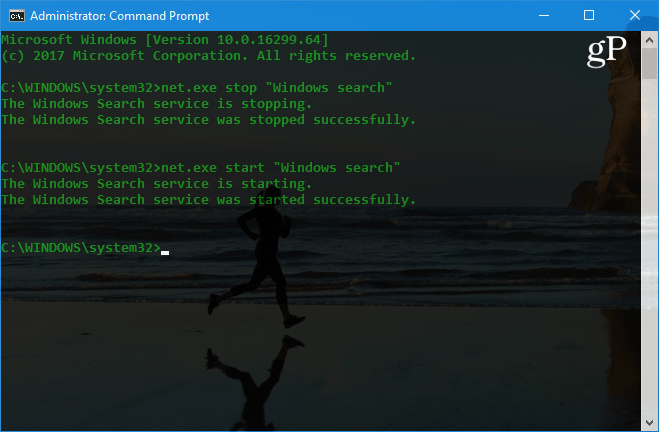
Hit the Windows Key and type: cmd and right-click Command Prompt from the result at the top and click Run as Administrator.

Then in the Command Prompt type: net.exe stop “Windows search” and hit Enter. After that, check Task Manager to see where the disk usage is at. If there is no change, you can restart it from the command line, type: net.exe start “Windows search” and hit Enter.
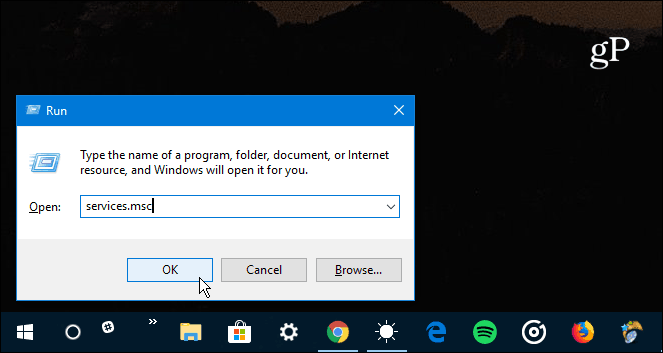
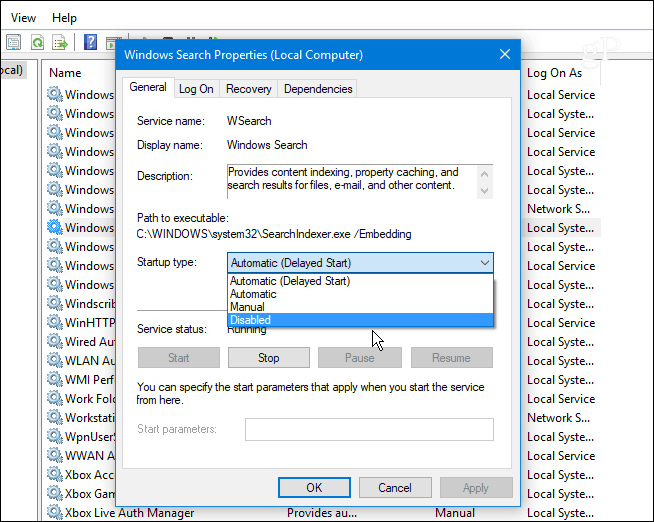
The good is turning off Windows Search is just temporary, and you can see if performance improves. If this fixes the issue, you can turn it off permanently. Hit the keyboard shortcut Windows key + R and type: services.msc and click OK or hit Enter.
Scroll down the list of services and double-click Windows Search, and under the General tab, set the “Startup type” to Disabled and click OK and close out of services.
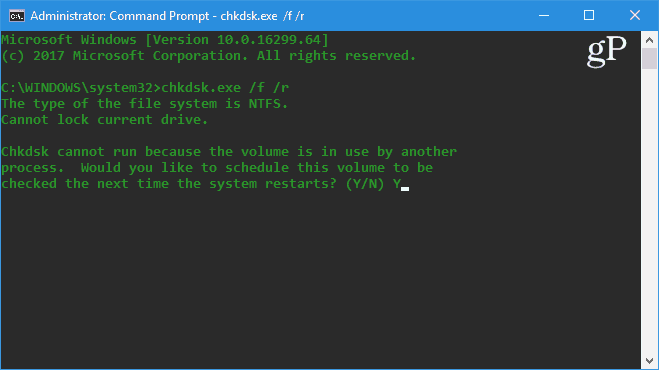
Run a Disk Check
Windows has a built-in tool that will scan your drive for errors and attempt to correct them. Open the Command Prompt as Admin and type: chkdsk.exe /f /r and hit Enter. Then on the next prompt type: Y and hit Enter.
For more detailed information on the many ways to run and use this utility, check out our article on how to prevent issues and fix errors with Disk Check in Windows 10.
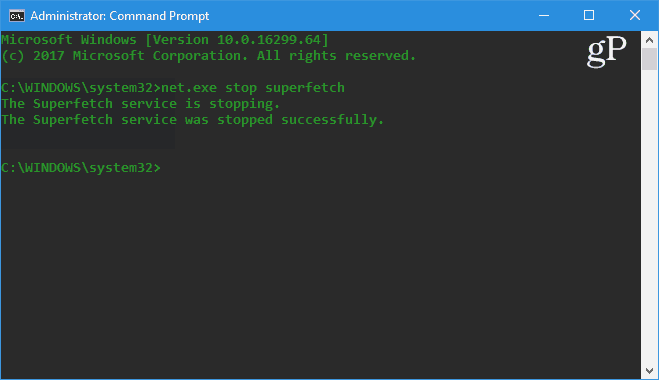
Disable the SuperFetch Feature
SuperFetch is a feature that helps decrease boot time by making apps load more efficiently. However, it can cause problems with your drive. To disable it, launch the Command Prompt as Admin and type: net.exe stop superfetch and hit Enter. Give it a few minutes and see if that improves the disk usage percentage in Task Manager.
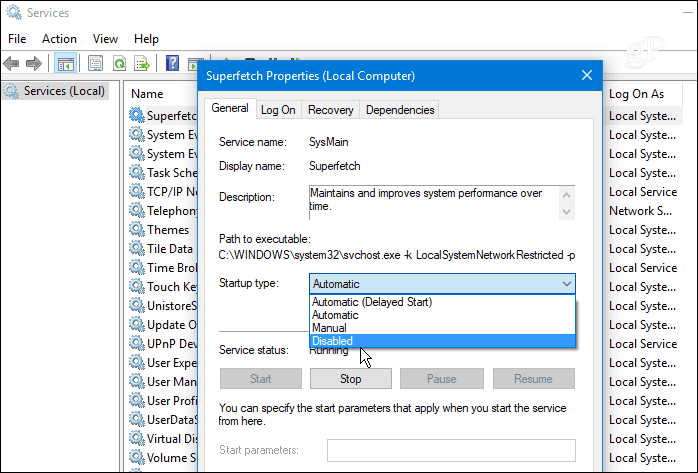
If this fixes it, you can permanently disable it, just like you can with Window Search (shown above), by heading to services.msc and disable the Windows SuperFetch feature.
Fix Chrome or Skype
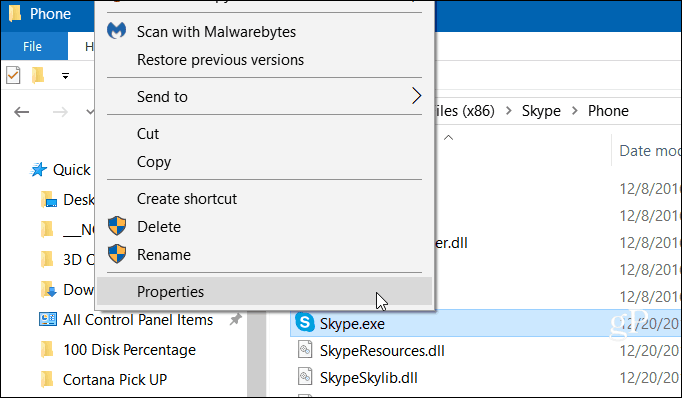
A couple of other programs that have often been reported as causing the 100 percent disk issue are Skype and Chrome. If you find that Skype is causing a problem, close out of it completely. Then head to C:\Program Files (x86)\Skype\Phone and right-click on Skype.exe and select Properties.
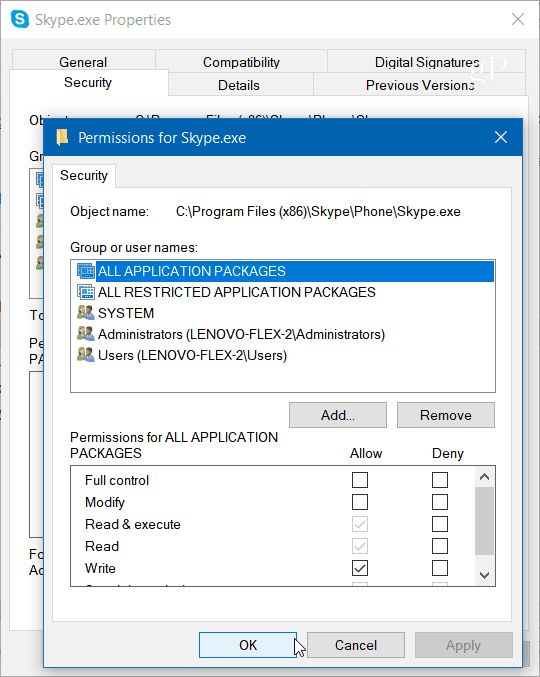
Head to the Security tab and click the Edit button. Make sure All Application Packages are highlighted and check Allow for Write Permissions and click OK.
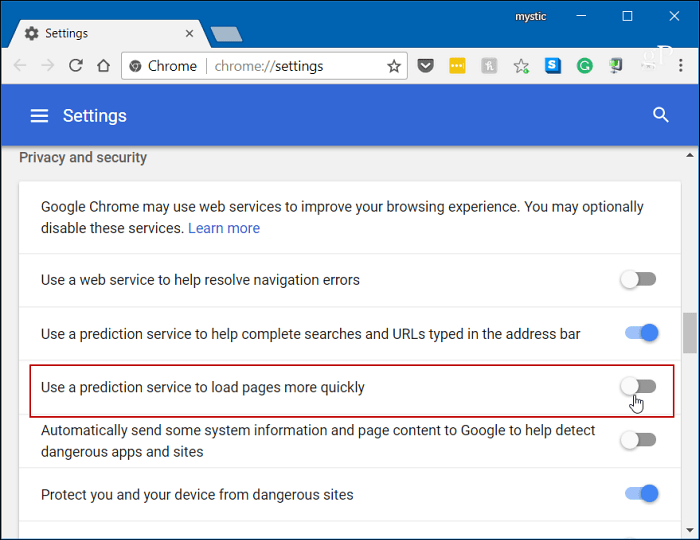
For Chrome, the most common issue is it uses too many resources with its prediction service to load pages faster. To disable it, head to Advanced Settings, and under the Privacy and Security section, turn off “Use a prediction service to load pages more quickly” and restart the browser.
Wrapping Up
Usually, one of the options above will fix an over-worked hard drive, but not always. If you’re running an antivirus suite like Norton or Kaspersky. Ensure your computer is offline, and then temporarily disable the antivirus software to see if things improve. If so, contact the company’s customer service. Also, make sure all device drivers are up-to-date, and another place to look is Virtual Memory. If you have made changes to it in the past, go back and reset it to default settings.
Have you experienced this problem on your Windows PC? Let us know the steps you took to fix it. And for more tips, tricks, and troubleshooting advice, check out our Windows 10 Forums.


Ji
Also worth starting up Resource monitor (Bottom left of the Taskmanager Performance tab) and seeing what is doing disk usage – swapfile conflict (OK actually RAM acquisition) and MFT processing – as in getting file details – and space allocation – expanding and contracting swapfile allocation)
Ziggy
For readers who want an alternative to Microsoft Search try the free program “Everything” – comes as a portable app or installer. Just google it and make sure that you download it from a reputable site and then scan it online with VirusTotal.
As per article, I’ve tried turning off Superfetch but I find that it makes very little difference, and you are better leaving it on.
Brian Burgess
Everything is an AWESOME utility. Especially on older versions of Windows running on a HDD. I wrote about it a few years back:
https://www.groovypost.com/reviews/freeware-everything-voidtools/
Mark
Thanks Ziggy, i was going to search for an alternative right after I posted this comment:
Does this article apply to SSD’s?
Ziggy
@Mark. if you have an SSD drive leave well alone. You really shouldn’t have to muck around with these type of drives. And the advice is not to use a defrag tool to defragment an SSD drive as one would do with a normal hard drive.
Mark
Thanks for the reply. I had a feeling i was OK, not really having the issues talked about here. I’m just always interested in improving performance. I come from the Mac world, windoze is so much more complicated to me! BTW, I love “Everything”
Brian Burgess
@Mark I have only seen this issue on standard Hard Drives and never an SSD, but if someone has seen it I’d love to hear about it.
Amy
Wow–perfect timing. 100% Disk Usage has been the bane of my existence. I couldn’t find good info & finally decided to do a clean install. I haven’t finished putting things back together, but can already see that the problem is still there. I have no regrets about going with the nuclear option. It’s good to get rid of clutter & start fresh, but I’m really happy to have this article so I can trouble-shoot the Disk Usage issue. Glad to have found this site!
Amy
:Update:
I spoke too soon about the clean install. After I got my apps & files set up, the disk usage rarely goes over 10%. When it does go up, it goes back down in a few seconds. The highest I’ve seen has been 83%. I did the full clean install that reformats and allows user to select partitions to be included in the reformat, so I have a lot more room on the drive. Clean install is an extreme move. It’s time-consuming & there are a couple of pain-in-butt glitches to work around, but everything is faster & smoother after getting rid of update after update from Win 10 & any residuals from Win 7. There’s more than one way to do a clean install– ex Fresh Start in Defender. But the full, deep-down install after reformat is best done with a download of Windows 10 Installation / Media Creation Tool.
Didn’t mean to go on & on– I’m just really happy with the results & am totally rid of the 100% Disk usage horror :p
Mergatroid
I am a PC tech.
I do multiple Windows installations per week.
I see this problem all the time. I will have 6 Dell PCs that all need to have the O/S reinstalled, and sometimes one out of the six will have this problem right after a clean installation.
I know some sites will tell you to start disabling things like superfetch, but this is only a workaround and not a solution.
I have not, after years, found a solution to this issue. Sometimes reinstalling Windows a second time will correct the issue, and sometimes not.
I have updated firmware, tried different RAM and hard drives, but sometimes nothing will seem to correct the issue. With an SSD, the fault can still happen but since SSDs are so fast, it will never use up 100% so you just don’t notice it.
Never the less, every time I run into it I check online to see if there are any new solutions available.
If I purchased a brand new computer that did this out-of-the-box, I would return it immediately.
I have had a few clients bring me in computers they have been using for years complaining about the computer being slow, and when I check it I find the same problem. If troubleshooting it does not reveal the cause, then I will recommend an SSD installation to basically overpower the problem with a super fast drive.
Ziggy
With the numerous iterations of Windows 10 constantly offered, I am now finding that depending on the Windows version offered by Microsoft, can make a big difference in the speed of the pc. I have an old Msi Laptop circa 2010 and it’s running very well using WinVer 1903. build 18362.207. Same goes for a home made desktop that I had built in 2008, running on an older intel i5 chip. The desktop mentioned uses an old Pata hardrive (150 gigs) and has just a few essential programs that keeps it lean. With said machines I have never done a clean install but I agree wholeheartedly with the sentiments expressed in Mergatroid’s comments – sometimes it works, sometimes it just doesn’t make a difference. 50/50 on that one.
MissMeliss
I am a SysAdmin and I run into this issue quite often on different machines. I have not run into it with servers, just workstations. The only solution I have found that works religiously is changing the virtual memory to mid-max settings.
Defaults are usually the lowest setting (I do not understand why this is).
I had tried disabling the fetchers and this seems to provide some relief but usually not enough. Have also tried disabling Windows search index and I get similar results.
Change the virtual memory, works every time.