How to Install macOS on a New SSD
Installing an SSD can help give an older computer a new lease of life. If you own a Mac and want to install macOS on a new SSD, follow this guide.
Installing a Solid-State Drive can turn an older, sluggish computer into a decent machine again. If you already have an SSD installed, you might want to upgrade it to one with more storage space.
If you use a Mac, it’s possible to install a new SSD. An SSD on its own isn’t much use, however. You’ll need to install macOS onto it to get your Mac up and running again. There are several ways to do so, and we’ll take a look at some of them below.
If you’re ready to make the upgrade, then here’s how to install macOS on a new SSD.
How to Install macOS on a New SSD Using macOS Recovery
On any Mac made after 2009, there is a built-in recovery system. This allows you to boot your Mac into recovery mode. In this mode, you can repair your internal disks, restore files from a Time Machine backup, get online help, or reinstall macOS.
You must be able to connect to the internet in order to use these tools. You can use the macOS installation tool to install macOS on a new SSD that you have installed in your computer.
To install macOS on an SSD using Internet Recovery:
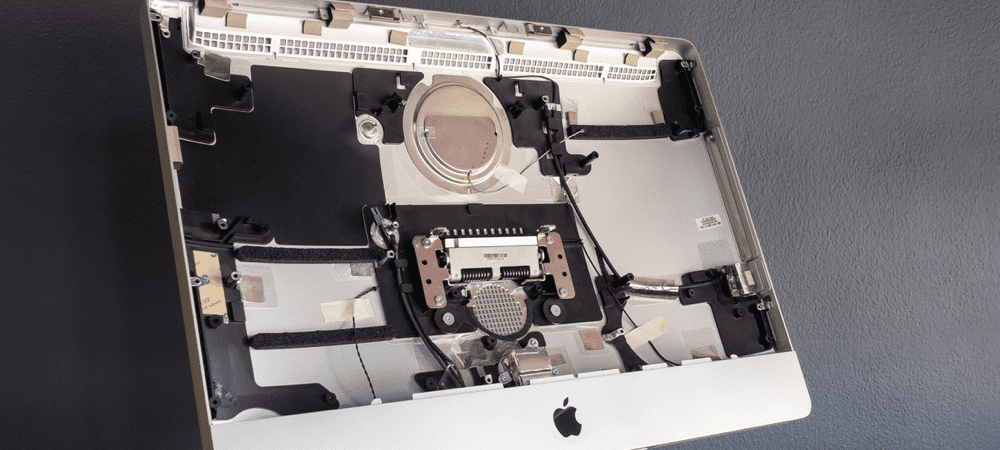
- Install the new SSD into your computer, following the manufacturer’s instructions for your specific model of Mac.
- If you’re using an Intel Mac, press the power button to start up your computer, then immediately hold down Cmd+Option+R.
- For M1 Macs, press and hold the power button until you see a message informing you that if you keep holding the button, you will access the startup options. Keep holding until the options appear, then select Options > Recovery.
- Once you see the message that Recovery is starting, you can release the keys.

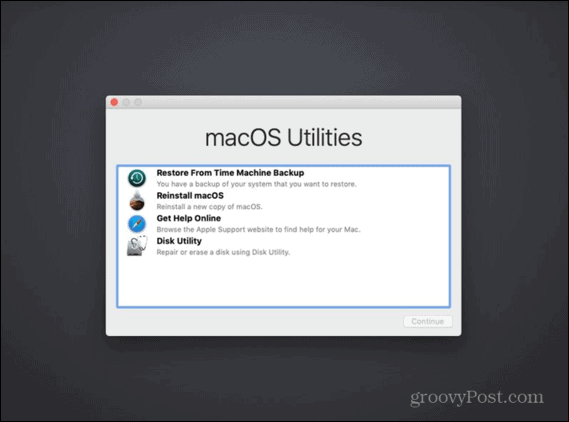
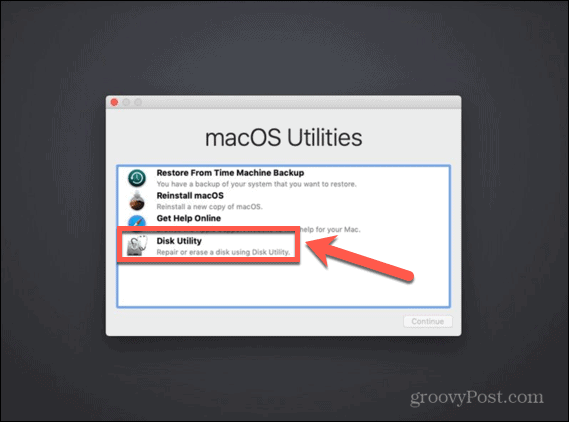
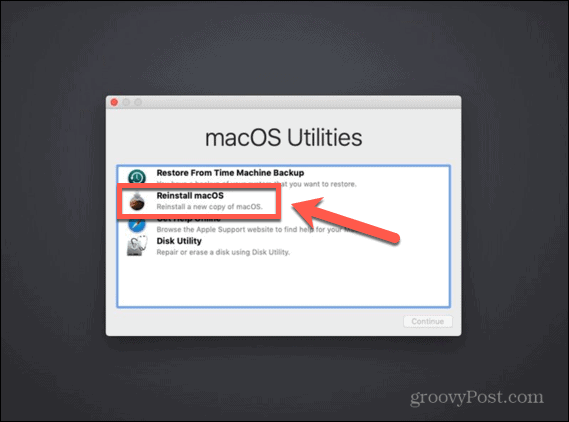
- When Recovery has finished loading, you’ll see the available macOS Utilities.

- Before you install macOS, you’ll need to format your new SSD. Select Disk Utility.
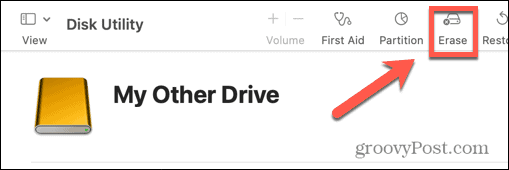
- Select your new SSD in the left-hand menu and click Erase.

- Fill in the required details for your new drive, such as the name and format. For an SSD, APFS is the best choice of format, but if you’re using an older Mac, you may need to choose Mac OS Extended as APFS won’t work with macOS Sierra or older.
- If there is an option to select a Scheme, choose GUID Partition Map.
- Wait for the drive to finish formatting, then press Cmd+Q to return to the main menu.
- Click Reinstall macOS.
- Follow the on-screen instructions, ensuring that you select your new SSD drive as the destination.
- Once macOS has finished installing, take your Mac for a spin.

How to Install macOS on a New SSD With a Bootable Installer
Another option for installing macOS onto your new SSD is to create a bootable installer. This is particularly useful if you want to install macOS on multiple computers, as it saves you from downloading the installer each time. You’ll need a flash drive or external disk drive with at least 15 GB of free space. It should be formatted as Mac OS Extended.
How to Create a Bootable macOS Installer
The first step in using an installer to install macOS on a new SSD is to create the installer itself. You’ll need a suitable flash drive or external hard drive, and a copy of the macOS installer for the version of macOS you require.
To create a bootable macOS installer:
- Download the macOS installer for the version of macOS that you want to install on your SSD and save it in your Applications folder.
- Plug your external drive into your computer.
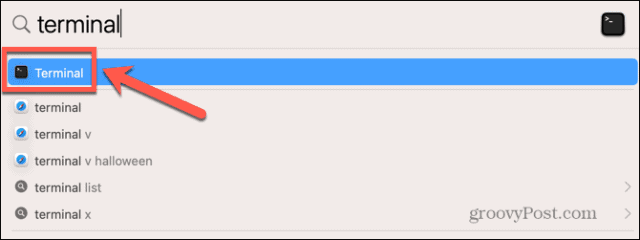
- Open Spotlight Search by pressing Cmd+Space and typing Terminal.
- Double-click the Terminal app in the results.

- Enter one of the following commands, depending on the OS you’re creating a bootable installer for. Replace MyDrive with the name of your flash drive or external hard drive.
- Ventura: sudo /Applications/Install\ macOS\ Ventura.app/Contents/Resources/createinstallmedia –volume /Volumes/MyDrive
- Monterey: sudo /Applications/Install\ macOS\ Monterey.app/Contents/Resources/createinstallmedia –volume /Volumes/MyDrive
- Big Sur: sudo /Applications/Install\ macOS\ Big\ Sur.app/Contents/Resources/createinstallmedia –volume /Volumes/MyDrive
- Catalina: sudo /Applications/Install\ macOS\ Catalina.app/Contents/Resources/createinstallmedia –volume /Volumes/MyDrive
- Mojave: sudo /Applications/Install\ macOS\ Mojave.app/Contents/Resources/createinstallmedia –volume /Volumes/MyDrive
- High Sierra: sudo /Applications/Install\ macOS\ High\ Sierra.app/Contents/Resources/createinstallmedia –volume /Volumes/MyDrive
- Sierra: sudo /Applications/Install\ macOS\ Sierra.app/Contents/Resources/createinstallmedia –volume /Volumes/MyDrive –applicationpath /Applications/Install\ macOS\ Sierra.app
- El Capitan: sudo /Applications/Install\ OS\ X\ El\ Capitan.app/Contents/Resources/createinstallmedia –volume /Volumes/MyDrive –applicationpath /Applications/Install\ OS\ X\ El\ Capitan.app
- Press Enter.
- Enter your administrator password when prompted and press Enter.
- Type Y to confirm erasing the destination volume.
- Click OK to allow Terminal to access files on the bootable disk.
- Once the process is completed, exit Terminal and eject your bootable disk. It’s now ready to use.
How to Use a Bootable Installer to Install macOS
The way that you use your installer will be slightly different, depending on whether you’re using an Intel Mac or a newer Mac that has Apple Silicon.
To use a bootable installer to install macOS on an Intel Mac:
- Install the SSD into your computer following the manufacturer’s instructions for your model of computer.
- Plug the bootable installer that you have created into your Mac.
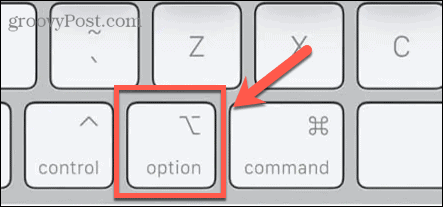
- Power on the Mac and immediately hold down the Option key.

- When you see a screen showing the bootable volumes, you can release the Option key.
- Select the drive containing your bootable installer and press Enter.
- You may be asked to select a language.
- Select Install macOS and click Continue.
- Follow the instructions to complete the installation of macOS.
To use a bootable installer to install macOS on an Apple Silicon Mac:
- Install the SSD into your computer following the manufacturer’s instructions for your model of computer.
- Plug the bootable installer that you have created into your Mac.
- Press and hold the power button on your Mac.
- When you see the startup options, you can release the power button.
- Select the drive containing your bootable installer and click Continue.
- Follow the instructions to complete your installation of macOS.
How to Install macOS on a New SSD Using Carbon Copy Cloner
Installing any operating system on your computer has the potential to go wrong, so it’s always a good idea to back up your Mac before you make any changes to it. If you want to be sure that macOS installs correctly on your SSD before you install it, then you can mount it in an external hard drive enclosure. You can then use Carbon Copy Cloner to install macOS on the SSD as if it were an external disk.
This allows you to test your installation of macOS before you install the SSD in your computer. It means you have peace of mind that the installation went as planned before you start opening up your Mac.
What is Carbon Copy Cloner?
Carbon Copy Cloner is an app that allows you to clone a copy of your hard drive to an external drive or flash drive. Although this is a paid app, there is a 30-day free trial that allows you to use the full features of the app.
To install macOS on an SSD using Carbon Copy Cloner:
- Download and install Carbon Copy Cloner. If you’re running Catalina or higher, you should use Carbon Copy Cloner 6. For earlier versions of macOS, use Carbon Copy Cloner 5.
- Put the SSD into your enclosure following the manufacturer’s instructions.
- Connect the drive to your Mac.
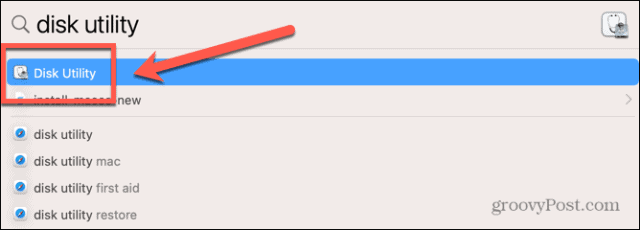
- Open Spotlight Search by pressing Cmd+Space and type Disk Utility.

- Double-click the Disk Utility app in the results.
- Select the SSD and click Erase.
- Fill in the required details for your new drive, such as the name and format. For an SSD, APFS is the best choice of format, but if you’re using an older Mac, you may need to choose Mac OS Extended as APFS won’t work with macOS Sierra or older.
- Select GUID Partition Map if given the option to select the
- Once the SSD is formatted, quit Disk Utility.
- Open Carbon Copy Cloner.
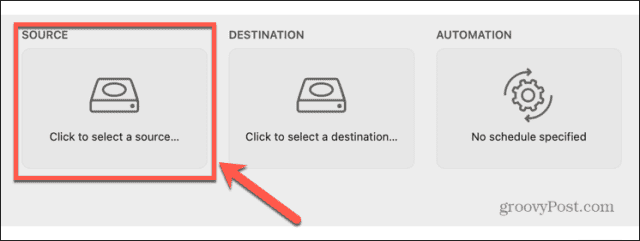
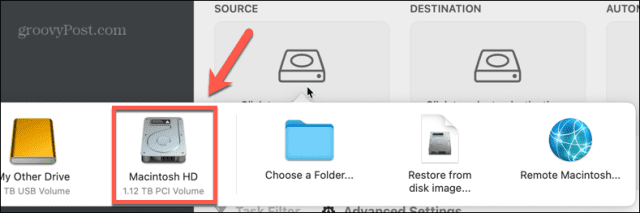
- Click the Source button.

- Select your Mac internal drive.

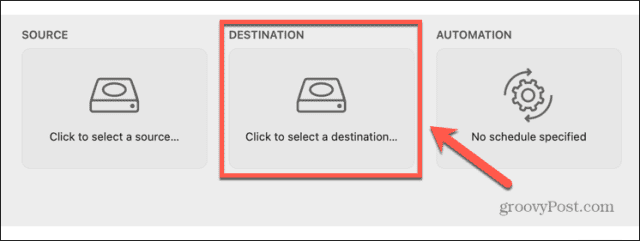
- Click the Destination button and select your SSD.
- Click Start and your hard drive will be cloned to your new SSD. This will take some time.

- Once the cloning is complete, reboot your computer and immediately hold down the Option key.
- When the Startup Manager appears, you can release the Option key.
- Select your SSD in Startup Manager and press Enter.
- Your computer should boot from your SSD. Have a play around to ensure that everything is as it should be.
- If you’re happy with the installation, power off your Mac.
- Remove the SSD from the enclosure and install it in your Mac, following the manufacturer’s instructions for your computer.
- Power up your Mac and it should boot from your new SSD.

Get More From Your Mac
Learning how to install macOS on a new SSD can help you breathe new life into an older Mac or allow you to upgrade the SSD you currently use. There are plenty more ways that you can get more from your Mac.
If you’re running out of storage, you can map a network drive on your Mac to give you more space to work with. You can create shortcuts on your Mac to automate repetitive tasks or create home automations. You can also use Focus on Mac to remove distractions when you’re trying to work.


carl
Im getting a macbook pro mid 2012 from my dad and thought about installing a new ssd along with memory before installing Ventura via a Patcher.
I noticed that older macs need to use extended to partition the ssd but new ones (i assume operating system?) needs to use APFS.
Would installing SSD first using Extended and then installing Ventura cause problems because ive selected a method that works with an older OS or once it’s partitioned, does it not matter? What would be the correct order of exectuiong to upgrade…
– Memory
– SSD
– OS to venture via Patcher?