Rachio 3 Smart Watering System
If you’re a homeowner with a lawn there’s a good chance you need an in-ground sprinkler system. The Rachio smart watering system makes having a great lawn easy.
If you’re a homeowner and have a lawn, it needs water, and there’s a good chance you have an in-ground sprinkler system. There’s also a pretty good chance the system you have is antiquated and can be over or under watering your lawn. There is a better way.
Rachio 3
The Rachio 3 unit is very unassuming. It’s much smaller than the old-fashioned type controllers, and there’s just an unobtrusive dial on the left side, and color LED across the middle. While you can manually control some functions from the unit, that’s not the purpose of the system.

The Rachio 3 unit replaces your current controller, which is probably the old-fashioned type that uses a dial and buttons with a small LCD. Those systems are obtuse to learn, set-up, and use, and they are inflexible and inefficient. The Rachio 3 is available in an eight or 16 zone version. Each zone can have a schedule, or they can be grouped based on similar types, such as grass or shrubs. The system affords the user a great deal of flexibility and customization.
The Rachio 3 controller allows you to do everything from your iPhone or Android smartphone; you can also access most functionality from a Web browser. And in addition to that, the system is smart, allowing you to save water with no intervention on your part. The system uses the exact location of your home, along with hyper-local weather reports, to adjust your watering schedule. Want to add a little extra moisture or use less water? You can easily do so anytime you’d like, from anywhere you can use your smartphone.
Requirements
To install Rachio 3, you’ll need an existing installed in-ground sprinkler system, a robust 2.4 GHz or 5 GHz Wi-Fi signal, and an iPhone or Android smartphone. You will need a good Wi-Fi signal to the location where the Rachio 3 will be connected. Many existing systems have the controller in the garage, so that’s something to keep in mind. The Rachio unit is designed for indoor installation; for outdoor installation, you’ll need an Outdoor Weatherproof Enclosure, which the company sells.
The Rachio 3 is also compatible with Amazon Alexa, Apple HomeKit, Google Assistant, Nest, IFTTT, Wink, Control4, and Nexia. For this article, I used the Rachio 3 app on an Apple iPhone.
Installation
If you’re reasonably handy, Rachio 3 is easy to install. If you’re lazy, like me, you can have a professional do it. When I saw how easy it was to install, I realized I could have certainly done it myself with little effort.
The installation process consists of testing your existing system to make sure that the zones are all working correctly. Take a photo of the wiring before removing the old controller unit. Remove the old unit. Mount the Rachio 3 on the wall and install the wires. Configuring the controller with your smartphone is the final step. Simple, right?
Configuration
Zones
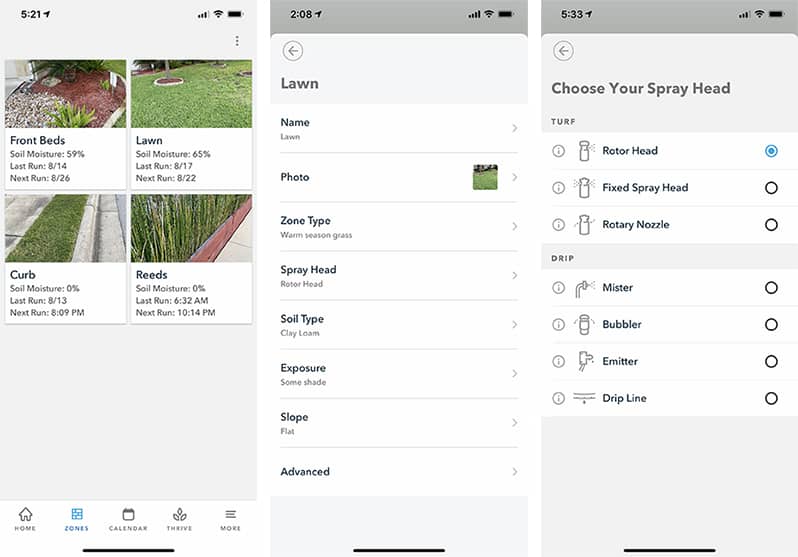
Once everything has been installed, it will be time to configure your zones. You can take a photo of each zone if you like, which is handy for remembering which is which instead of just a number on your old system. You can also name your zones accordingly. Next, you’ll fill in the zone type (grass, shrubs, trees, etc.), spray head type (rotor, fixed, bubbler, etc.), soil type (loam, sand, clay, etc.), exposure (shade, sun, etc.), slope (flat, steep, etc.), and there are more technically advanced settings which you’ll probably never need.
Schedules
You can have as many schedules as you’d like. The schedule consists of a name, type (fixed, flex monthly, or flex daily), interval (day of the week), zones, times (after sunset, specific time, etc.), watering duration, start/end dates, cycle and soak, and Weather Intelligence (freeze skip, wind skip). Once you have your zones and schedules configured, you’re ready to use your system.
Daily Usage
The Rachio 3 system, for the most part, runs itself. The system determines when and how much to water based on the zone information you have provided along with the schedules you have set, and the hyper-local weather. The system will provide you with a calendar where you can see how many schedules will be activated on any given date. Tapping on any date will provide you with the details for what will happen on that date. Keep in mind that schedules can change over time based upon the weather. If it rains and the rain exceeds the set threshold, the schedules will be skipped to save water. If the weather is drier than previously predicted, additional watering will be automatically scheduled. Freezing weather, wind, or ground saturation can be set to skip schedules. The system lets you set the thresholds for these. If you enable phone notifications, the Rachio 3 system will notify you about a whole host of user-selectable events.

Quick Run
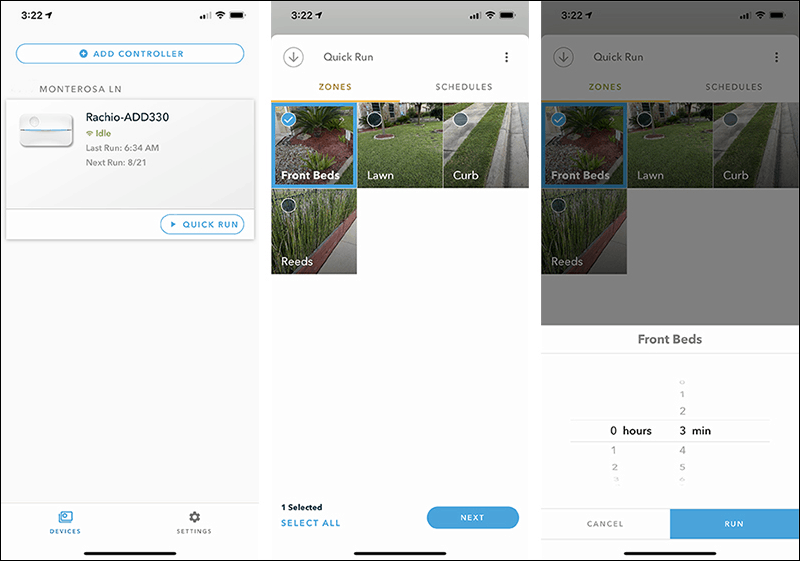
The Rachio system allows you to very easily use your smartphone to initiate a Quick Run, which will enable you to manually water whichever zones you want for any amount of time from one minute to 24 hours. It allows you to select any or all your zones for the Quick Run. This feature is useful for testing your system or just adding some water when things look a little dry without having to modify your schedules. It’s also a perfect way to water-in any fertilizer, seed, or weed treatment you may have just applied, without waiting for the next schedule to run.
Statistics
If you’re interested in seeing exactly what your Rachio system is doing and how much water you are saving by using it, there is a variety of data available to you.
When you tap on your controller from the main screen, you are brought to a five-day view. The view shows the weather and the number of schedules that are set for today, the two previous days, and the next two upcoming days. If you scroll down further, you will be presented with your total usage for the current month. Tapping on Usage will take you to a breakdown By Zone and below that Daily Usage.

If you tap the More button from the bottom right of your screen, this will take you to a menu where you can select History, which will take you to a listing that details every activity that your system performed since it was installed. Enough information is provided by the system to give you a good picture of what is going on with your watering and then some.
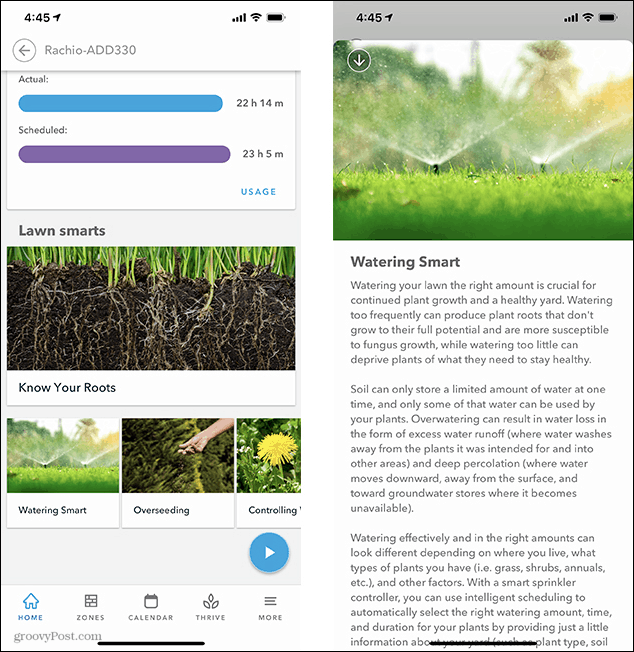
Lawn Smarts
The Lawn Smarts section of the app shows several different topics of lawn information. By tapping on one of the photos, you are taken to a page that provides detailed information about the selected subject. This information is handy if you’re having issues with your landscaping, or you just want to learn more about what goes into maintaining a healthy lawn.
Web Access
You can access most of the app functionality via the Web. You can log into the Rachio account you set up when configuring your system with your smartphone. Navigate to www.rachio.com and click the Login link in the upper right corner. You will see your controller pictured. Click on the photo of your controller to access its functionality. The screens are similar to those on the phone and easy to understand and use. It’s nice that Rachio gives you the option of Web control via a browser.

Conclusion
The days of standing in my sweltering garage in front of my old controller with an instruction manual whenever I wanted to make a change to my old system are gone, and I’ll never look back. It’s effortless and intuitive to make any changes to your system using your smartphone from the comfort of your comfortable chair. The Rachio 3 system will give you much more control than was ever possible with your old watering system, and I highly recommend it. Your lawn will look better, and you’ll save water in the process too.


