How to Make Photos Private on Facebook
Want to limit who can view your Facebook pictures? You’ll need to start changing your Facebook photo privacy settings. This guide explains how.
Do you want to share your photos on Facebook without letting everyone see them? Perhaps you have some personal or sensitive pictures that you don’t want strangers or (even some friends) to access. Maybe you want to keep a closer hold on the data you’re sharing online.
Whatever your reason, you can make your photos private on Facebook using several methods. In this article, we’ll show you how to do it for mobile and PC users. You’ll learn to change the privacy settings for individual photos, albums, and profile pictures.
How to Make Individual Facebook Photos Private on PC or Mac
If you prefer using Facebook on your PC or Mac, you can change your photo privacy settings using the website.
To make a single photo private on Facebook on a PC or Mac:
- Go to the Facebook website and log in with your account.
- Click on your name in the top-right corner and then click your name to go to your profile page.

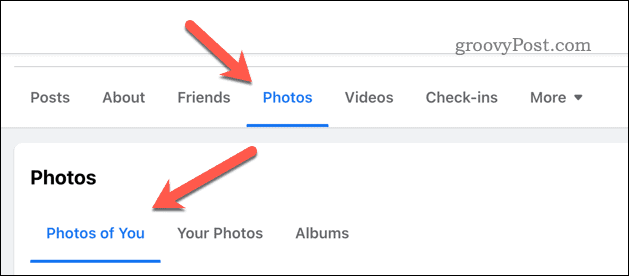
- Next, click Photos and click either Photos of You or Your Photos.

- Find the photo you want to make private and click on it.
- Click the three-dots icon in the top-right corner and select Edit audience.

- Choose who can see your photo from the options available, such as Public, Friends, Friends except…, or Only me.
- Click Done to save your changes.


Your photo privacy will update immediately.
How to Make Facebook Albums Private on Mobile
In the Facebook app for Android and iPhone users, individual photos take their privacy levels from the album they’re currently in. That means that, to make either individual photos or a group of photos private using the mobile app, you’ll need to place them in an album first.
If you don’t already have an album for your photos, you can create one and move them across. Alternatively, you can edit an existing album to change the privacy settings. Any changes to that album’s privacy settings will apply to all photos simultaneously.
You can make a private Facebook album by using the Facebook app on Android and iPhone devices.
To make a private Facebook album using your mobile device:
- Open the Facebook app and tap on your profile picture.
- Tap on Photos and select Albums.

- To create a new album, tap Create Album at the top.
- If you’re creating a new album, give it a name, then tap Next when you’re done. You’ll need to add pictures to it afterward.
- When you’re ready to edit the album, tap the three-dots icon in the top-right and select Edit from the menu.

- In the Edit album menu, select the current privacy level beneath the description box,

- Select one of the privacy levels from the options available: Public, Friends, Friends except…, or Only me.

- Tap back, then tap Done to save your changes.


How to Make Facebook Albums Private on PC or Mac
If you’re using Facebook on your PC or Mac, you can also update an album’s privacy settings using the website. As with mobile users, the privacy settings you set for your album on a PC or Mac will apply to mobile users.
You may find it easier to manage your album privacy settings this way. If you do, follow the steps below to get started.
To make albums private on Facebook on a PC or Mac:
- Go to the Facebook website and sign in with your account.
- Click on your name in the top-right corner to go to your profile page.
- Next, press Photos and select Albums.
- To create a new album, click Create Album in the top-left corner and fill in the required details.
- To edit an existing album, click on it, tap the three-dots icon in the top-right, then press Edit album.

- In the side panel, you can choose your privacy level—press the current privacy level beneath the Edit album label (Eg. Only me).

- Select a new privacy level from the options provided: Public, Friends, Friends except…, Specific friends, Only me, or Custom.
- Click Done to save your changes.

- To save the album, press Save in the bottom-left corner.


How to Make Profile Pictures Private in Facebook on Mobile
Your profile picture is one of the most visible parts of your Facebook account. If you don’t want anyone else but yourself (or selected people) to see your profile picture, you can make it private using the Facebook app.
To make your Facebook profile picture private on mobile:
- Open the Facebook app and tap on your profile picture.
- Tap Photos and select the Profile Pictures album.
- Find the profile picture you want to make private and tap on it.
- Tap the three-dots icon in the top-right corner and select Edit Privacy.

- Choose who can see your profile picture by selecting Public, Friends, Friends except…, Specific friends, or Only me
- Tap back to exit and save your changes.

How to Make Facebook Profile Pictures Private on PC
You can also make your Facebook profile picture private by logging in to your account using a web browser on a PC or Mac.
To change your Facebook profile picture privacy settings on PC or Mac:
- Go to the Facebook website and sign in with your account.
- Click on your name in the top-right corner to go to your profile page.
- Select Photos > Albums.
- Click the Profile Pictures album.
- Find the profile picture you want to make private and click on it.
- Select the three-dots icon in the top-right corner and select Edit audience.
- Choose who can see your profile picture from these options: Public, Friends except…, or Friends.
- Press Done to confirm the changes.
Managing Access to Your Facebook Pictures
Making your photos private on Facebook is a good way to protect your online privacy and prevent unwanted people from accessing your personal or sensitive pictures. You can easily change the privacy settings for individual photos, albums, and even your profile pictures using any device that Facebook supports.
Want to go further to protect your privacy? You can switch off your Facebook active status to hide when you’re online. If you want a rebrand, you might consider changing your Facebook username to something different (especially if you’ve had your account for a long time).
You can also download a copy of your Facebook data if you want to take a look at what information Meta (Facebook’s owner) has saved about you.


